In honor of Throw Back Thursday, I'd wanted to share Bubba's first birthday party with you...it happened October of 2011 and I never got around to posting about it. My son's first birthday was probably my greatest achievement as a party planner, or at least I like to think so! :p I started planning the party in July, and had a BUH-LAST incorporating and coordinating everything. I LOVE carnival themes...or any event where we can have games and a prize booth, so naturally, we had a Birthday Carnival.
I had done a lot of web searching for different carnival themed parties to get ideas and there were so many that I had found very helpful. I thought someone else might be able to pull some ideas from the different activities and goodies we had at our event so, even though I'm over a year late on posting this, I wanted to get it up anyway.
Warning--there are LOTS of pictures in this post. Some were from my own camera, and some are from a friend of the family, Charlie who I'm very thankful for because I flaked out on hiring a photographer to catch all the Happenin' things from the party. I'd also like to mention that the day before the party, I threw my back out and by 3am the morning before the party, while we were doing all the last minute party preppping, I couldn't stand the pain any more and ended up in the Emergency Room. But thanks to my wonderful sister, and amazing sister-in-laws, we were able to get everything finished, packed and taken out to the party site. I was extremely nauseous from the pain meds the morning of Party Day and almost didn't make it to the Carnival, but by the grace of Heavenly Father...I made it...pain-free and ready to rock. :) To this day, I'm still in awe that everything happened the way it did.
So, here we go...I'll just list things out and hope that someone will find some helpful ideas for their next special event.
Let's start with the
INVITES. I found a Carnival digipack on Mygrafico.com. I can't remember who the designer was and I do not take any credit for the designing of the elements. If you recognize the pack, please leave a comment so I can credit properly. I made the invite to look like a Carnival ticket with all the party info on it. I also made an RSVP card with a cute little poem I came up with to ask the parents to send it back so that we'd have enough goodies for all the kids. Polynesian families are notorious for not having RSVPs (lol).

I am a big fan of Vistaprint and have always been really happy with the quality of their products. So, when I saw that they were printing large AND small postcards for F-R-E-E, I knew they would be PERFECT for the invite and RSVP card. I couldn't have been more pleased with the results. I used a circle craft punch to make cut out the corners of the invite to make it look like a ticket and put them in bright colored envelopes with address and return labels I designed to match the invite. *Note: to keep costs down, I ordered two months in advance of the party so that I could choose the cheapest shipping method (about three weeks), and still have them in time to distribute a month before the party.
GOODIES and FAVORS. The kids ranged from a few months old to 12 years old. Kids 3 and under were counted as "MUNCHKIN VIPS"
Each kid got a reusable tote bag to hold their "money" and prizes. I got these SUPER cheap at Oriental Trading. Babies under age 1 received a Bottle in their bag with a Munchkin VIP badge on it. Ages 1 & 2 received a sippy cup with the badge on it. Ages 3 & 4 got the big-kid straw cup with a badge on it.
I also put a bottle of Gerber Puff Snacks in the bags going to the Littlest of the Munchkin VIPs, with a note from Tali. :)
Because we were having Carnival games at the party where the kids could win "Tonka Bucks" (btw, my son's nickname at the time was Tonka) to redeem at the most AMAZING prize booth (to be seen later in the post), I wanted to make sure the babies of the party got a good amount of Tonka Bucks to spend on whatever they wanted. I designed the bucks myself and printed them on green printer paper. I also designed his Birthday "Logo" seen below on the left side of the envelope. I had originally wanted to have these printed on shirts for our family, but that didn't work out so I put them on the envelopes and Munchkin VIP badges.
So, each member of the "Munchkin VIP" club got an envelope of $1000 Tonka Bucks to take to the prize booth. :)
Each kid got a customized coloring & activity sheet wrapped around a box of crayons in their bag. The coloring sheet was printed on 11x17 paper and included a "thank you" message, word find, tic-tac-toe and other fun activities. They also received their tickets to play the Carnival games.
I wanted to make sure the adults had a good time too, so I created this little goody bag, "The Big People Fun Pack." It included some raffle tickets to be pulled throughout the party. We gave away prizes like a old fashioned popcorn maker, and funnel cake makers. The boxes had a carnival theme on them so they were PERFFFECT. They also had a some bingo cards in them (my mom and aunties love bingo, so this was a perfect activity), pens to mark their cards, and some mints.
CHECK-IN. When the guests arrived, they signed in and the kids picked up their tote bags and personalized luggage tags (another reason I needed all the parents to turn in RSVP cards--so that I could have tags made for the kids). I used the same digipack to create laminated luggage tags for the kids. I LOVE them...simple and perfect little customized favor.
Welcome Banner. I designed this and had it made at a local copy shop. It was SUPPOSED to be put a the Check-In table, but got left at home. I intentionally left off his age so that I could reuse the banner at future birthdays.
CARD BOX. This was one of my favorite items, and brings up a great little tip for your next party. I wanted a cardbox that fit the theme (as you can tell, theme is VERY important to me and it's important to be carried out throughout the event). This is a little welcome sign that I put on a BIRTHDAY GIFT PINATA I got for less than $10 from Wal-Mart! I just cut a hole in the top of the pinata and put this sign on the front panel, and VOILA--cardbox!

This is also one of my favorite elements from the party. I forgot to take a pic of it at the party, but good thing I snapped one when I built it. Because the party was going to be outdoors and there were going to be lots of kids running around, I wanted to make sure any gifts that were brought were in one place. I saw this awesome play tent on the Ikea website and knew I. HAD. TO. HAVE. IT! We don't have Ikea here in Hawaii, and so I asked my Cousin in LA and Aunt in Utah to check the Ikeas nearest them for one of these babies. LA was OUT, and Utah had ONE left, buried under tons of stuff. My aunt snatched it up and sent it on its way to Honolulu for my Bubba's party. It was displayed at the check-in table and kept all the gifts together during the party. Now, he plays hide and seek in it and it's a great reminder of the fun we had at the party.

Found this guy on Ebay. I'm TERRIFIED of clowns, especially 10-foot ones, but this guy seemed to fit in to my plans so well, I just couldn't pass him up.
The party was in the afternoon and outdoors so I got a couple of tubes of Kids Sunblock (one especially for babies) and left it at the check-in table with this sign. :)
Welcome Sign. Again, using the carnival themed digipack, I created another sign. I love signs. :) This was a Welcome Sign for the kids. :)
Tables & Centerpieces. One of my biggest pet peeves is when plastic tablecloths get TAPED to the tables. It's messy and kind of tacky (no offense, this is just my opinion). I knew I would have to figure out something to hold the tablecloths down since it was pretty windy at the Pavillion. Table clips didn't fit so when I saw these elastic tablecloths online that fit over tables like shower caps, Oh Man, I almost died. It's GENIUS, really. I ordered ones in red and blue and sat our yellow clown centerpieces on them.

Centerpieces. I found these little dudes online also. They were on clearance for around a $1 and change per piece so i ordered 30 of them for the centerpieces. I knew we had to make a LOT of these bad boys so I kept it simple. I found some Red/White popcorn tubs, stood the inflated clown in the middle with double stick tape, used a block of foam to hold up two large rainbow swirl lollipops from Walgreens. and covered the bottom of the tub with paper shred. I absolutely LOVED how they looked altogether. Of course I had to ask my sister-in-laws to help with the clowns because 30 little clowns on my living room floor is the kind of thing that will give me nightmares. :)
The Centerpieces can be seen behind my SIL in this pic. Also shown are the totes we gave the kids (right), Gift Box Pinata (left), and signs for the games (middle).
I wanted my son's grandparents to be easily recognized at the party, so I made them shirts. We had planned to get a bunch of them silk screened, but it didn't work out so I moved to the next best thing--iron on transfers. I also made shirts for myself, my husband and of course for Mr. Birthday Boy. I don't think anyone noticed, but my parents and I had the same colored lettering on our shirts, and my husband and his parents had the same colored lettering. Tali had both colors on his shirt. :)
Because we were outdoors, I thought it would be easiest to just get a bunch of cupcakes made and distribute them after singing Happy Birthday. I ordered several dozen cupcakes from Sam's Club (which I LOVE because they're so cheap and you only need to place your order 24 hours in advance). I bought some Circus Cupcake Toppers from Oriental Trading that I didn't get a picture of, but added some really cute flair to these yummies!
This is his Smash Cake from our dear friend of the family who had it made for him. He didn't get to smash it at the party...but Mommy sure had a great time eating it later that night! :)
I wanted to add some pizzazz to the drab posts of the Pavillion and decided to create some "Tonka Tidbits" to put up around the party. These were basically little fun facts about my Bubba. I think I had 10 in total. I got them printed at Sams (where all my other signs were printed), and put them on cardboard. My helpers added some streamers and balloons to make them extra festive.
This one was my favorite. :'( Tear...he's growing so fast!
The Pavillion was surrounded by a HUGE grassy area and since we were outdoors, why not get a bouncer.
And that we did! :) I wanetd to make sure we got one that kept with the same color scheme of Red, Yellow, and Blue. This one was HUUUUGE...and a big hit with both the big and small kiddies. We also rented cotton candy and popcorn machines so there was a lot to do in addition to the Carnival Games.
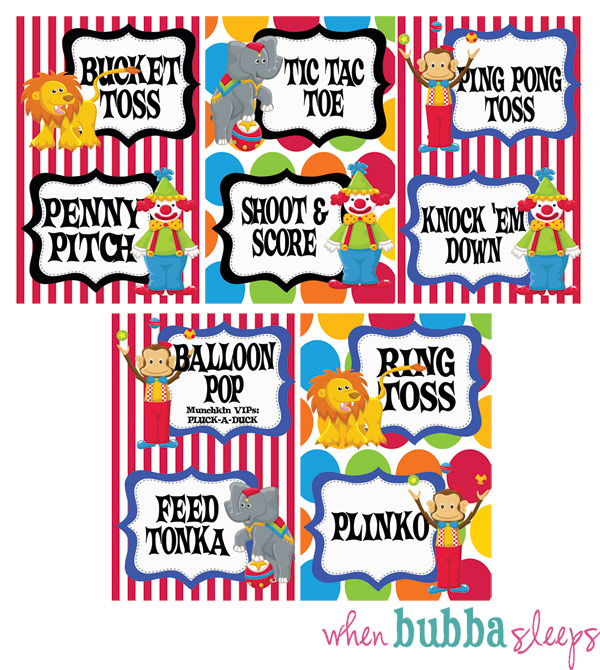
The Games. The "Midway of games" wasn't set up as I intended as we were running late and just had to get the game components up and running so the kids would have enough time to play. I planned for10 in all. Using the same carnival themed digipack from Mygrafico.com, I created the following signs for the games. Those characters really did steal my heart away...they are SO. ADORABLE.
I didn't get any good pictures of the individual games, but here are their descriptions:
1. Bucket Toss - lined up 6 buckets in a line (one right behind the other) and numbered them from 1 to 6. The kids were given 6 balls and had to throw each ball so that it landed in order starting at bucket 1 and ending at bucket 6.
2. Penny Pitch - Kids had to throw pennies so that they landed on marked targets on a table top.
3. Tic-Tac-Toe - I made a 3x3 tic-tac-toe grid out of a cardboard box and gave the kids three bean bags to throw and try to get 3 in a row.
4. Shoot & Score - At the time, my Bubba loved basketball so we decided we'd buy him a Fisher Price basketball hoop like this for his birthday, and figured we might as well use it as a carnvial game. We had three small basketballs for the kids to shoot with.
5. Ping Pong Toss - we ended up not doing this, but it was just a bunch of glass containers lined up and the kids had to toss ping pong balls into them.
6. Knock 'Em Down - I emptied 10 chicken stock cans and wrapped them in wrapping paper that matched the theme. Had them set up in a pyramid on a table and kids had three bean bags to try and knock them all down.
7. Balloon Pop & Pluck-A-Duck - Balloon Pop was going to be bunch of balloons in a wooded grid and the kids were going to throw darts to pop them. Last minute, we 86'd this game for safety reasons, but kept the Pluck-A-Duck game open. This was the Munchkin alternative so the kiddies weren't handling the sharp darts. Pluck-A-Duck consisted of 8 plastic ducks, ordered from Oriental Trading, floating in a tub. Each duck had either 100, 200 or 300 written on the bottom. Kids got to pick ONE duck and the number written on the duck was the amount of Tonka Bucks they won (I know--super easy...but it was intended for the itty bitty players. lol).
8. Feed Tonka - We blew up a picture of my son, put it on a foam board, and cut out the mouth portion. We gave the kids three bean bags that were supposed to look like the Gerber Puffs he loved to eat at the time, and they had to try and get them in his mouth. :)
9. Ring Toss - Lined up 10 2 Liter bottles wrapped in matching wrapping paper. I found diving rings at Walmart to use in the toss. They were on clearance and I thought they would be way better for the kids to throw than the little cane rings you usually see in this game
10. Plinko - I tried not to spend too much money on the games, but on the Plinko, I splurged a little bit. I ordered this one off Oriental Trading and it was a HIT. I used it several times since then and will continue to pull it out whenever we have family parties because it's such a fun game.
Munchkin VIP Tent. This idea didn't wasn't executed at the party, but I sure felt bad about it because I thought it was a SUPER one. :( I wanted the babies and toddlers of the party to have an especially fun time. So, I had planned on having a pop tent, with mats and balls and inflatables just for them. Because we were running so behind, I couldn't get this set up, but I sure had a CUTIE PATOOTIE sign made for it. :)
THE PRIZE TENT.
This was by-far the BIGGEST hit at the party. I wanted to give the kids the most amazing prize booth I could to redeem their Tonka Bucks. It's a personal mission of mine to make sure the kids that come to my parties don't just leave with broken cheapy favors and rubbish from candy in their goodie bags. I started collecting the prizes in July...I bid on lots on Ebay, ordered A LOT from Oriental Trading, scoured the clearance shelves at the stores, hit up Price Busters (similar to a dollar store, except everything isn't a dollar. lol), and just kept an eye out for inexpensive items that I could fill my shelves with. We had everything from pencils, to backpacks, to footballs, piggy banks and puzzles.
The week before the party, I had my helpers come over and divide up the prizes into sections and assign them Tonka Bucks "Prices."
Here are some close-ups of SOME of the prizes.
Candy toys including Pez dispensers, Scooby-Doo light up lollipops, and Star Wars M&Ms
Hello Kitty waterbottles, Variety of puzzles (Disney Princess, Spongebob, TMNT, Spiderman), Marvel Silly Bandz, Infant/Toddler friendly toys, Cartoon character watches, Pencil cases, Drawstring backpacks. Back-to-school Sales yielded GREAT prizes too--notebooks, folders, markers.
Footballs, Angry Birds plush dolls, Piggy Banks, Backpacks, Volleyballs, kites, bath toys, basketball hoops & foam balls.
I still can't believe I accumulated so much. :) The kids left the party with bags FULL of all kinds of toys and goodies... it was GREAT!
First birthdays are a pretty big thing for Polynesian families, especially here in Hawaii. We had over 50 children to plan for and had about 150 people in all there to celebrate with us. It's not quite the backyard bbq you would normally see, but after everything was said and done, it was the most wonderful way to celebrate our little Bubba's first year of life.
If you are planning a carnival themed party for your Little One and happened to find some useful ideas here, please leave me a comment below. I'd love to hear what you found helpful.
~xoxo, V.~


